All Categories
- Aesthetic Presets
- Cinematic Presets
- Portraits Presets
- Bright & Airy Presets
- Wedding Presets
- Travel Presets
- Film Presets
- Vintage Presets
- Beginners Presets
- Black & White Presets
- Food Presets
- Instagram Presets
- Mobile Presets
- Moody Presets
- Nature Presets
- Product Presets
- Professional Presets
- Real Estate Presets
- Sport Presets
- Summer Presets
- Wildlife Presets
- Winter Presets

-2")
adobe lightroom mobile presets
Easy-to-use Presets
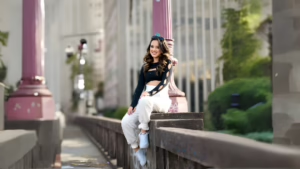
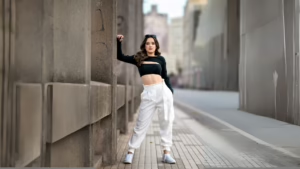
Simple and fast workflow with Adobe Lightroom mobile presets that is smartly matched to your style as a photographer irrespective of you being a professional or armature. Turn your photos into amazing art with one tap. With love, these presets will provide a cohesive look to your images that is not merely a style but will become your own.
Post Title :
adobe lightroom mobile presets
Presets Name :
Easy-to-use Presets
Brand :
File Type :
DNG , .XMP
Compatibility :
Mobile, Windows, Mac
Price :
Free To Download
How to Use
Easy-to-use Presets
on Mobile ( iOS & Android ):
- Adobe Lightroom Mobile is downloadable from the App Store or Google Play.
- Download and unzip the preset files and you will get DNG on your iOS & Android.
- Open up Lightroom Mobile and either create/sign on an Adobe account.
- Import the DNG preset file: Launch Lightroom > tap three-dot menu > Import Presets > select the preset files on your device.
- Open a photo in Lightroom mobile, then swipe up on the checklist of presets at the bottom to view all associated with your account.
- You can now tap on the imported preset and a TOOLS-based organizer will pop up where you need to paste (“APPLY”) this specific preset on your photo.
- Make any adjustments if necessary and save/export your edited photo.
- How to Use Presets on Windows
- Unzip the downloaded files that will be in XMP format.
- Open the Lightroom desktop application.
- There, click on File > Import Profiles and Presets.
- Choose the folder containing your unzipped preset files.
- Tap Import to import the presets into Lightroom.
- 3> Open a photo, go into the Develop module, you wil see the Presets panel on left side and Look for the preset.
- Swipe the sliders to adjust pieces of the photo, then save off a copy of what you changed.
- How to use Presets on macOS:
- Download and unzip the preset files on your Mac.
- Open and select Lightroom desktop on your Mac.
- File — Import Profiles and Presets…from the top menu.
- Find the preset files on your Mac and open them.
- Press on Import to use presets in Lightroom.
- Open a photo in the Develop module and navigate to the Presets panel, choose a preset.
- Edit the photo to your liking when finished save it or export the edited version.
- Additional tips:
- If you sync your presets with Lightroom CC desktop, they will automatically appear on lightroom mobile when you’re logged in with the same Adobe account.
- This is a workflow option for consistent editing using Lightroom presets, no matter the device. The import differs slightly by platform but the process is simple on all devices. After you have the presets set, the rest is as simple as a click or tap for some big time savings when you’re editing.
adobe lightroom mobile presets
Setting | Value | Descriptions
Basic Panel (Tone & Presence)
| Section | Setting | Value | Description |
| Basic | Temp (White Balance) | +4 | The image temperature is a little higher (more yellow). |
| Tint (White Balance) | +7 | A little more pink or magenta color. | |
| Exposure | +0.70 | Making the whole picture a little brighter. | |
| Contrast | -25 | Making the image softer by lowering the contrast between the brightest and darkest areas. | |
| Highlights | -75 | By making the brightest areas (skies, reflections) darker, you can get back details. | |
| Shadows | +43 | Making the dark areas brighter to show more detail. | |
| Whites | -67 | Pulling back the very bright whites so that they don’t clip or lose detail. | |
| Blacks | +8 | Deepening the darkest parts just a little bit to add more depth and contrast. | |
| Texture | +29 | Adding more detail to the mid-range frequencies to make it look more real. | |
| Clarity | -14 | A gentler, less sharp look by slightly softening the edges and mid-tone contrast of the image. | |
| Dehaze | +15 | Getting rid of haze and fog in the air for a clearer view. | |
| Vibrance | +48 | Making the muted colors much brighter while keeping the already bright colors safe. | |
| Saturation | +5 | Making all the colors a little bit brighter in the same way. |
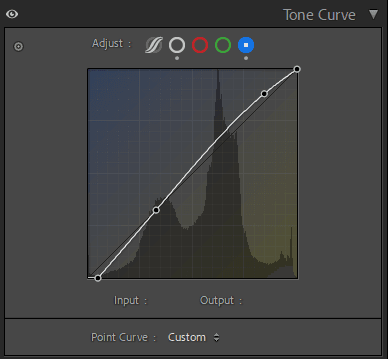
Tone Curve Panel

HSL / Color Mixer Panel
| Section | Setting | Value | Description |
| Color Mixer (HSL – Hue) | Red Hue | -8 | Moving Reds a little closer to Magenta. |
| Orange Hue | +12 | Moving Oranges a little bit toward Yellow. | |
| Yellow Hue | +30 | Changing the yellows a lot to the greens. | |
| Green Hue | -92 | Moving Greens a lot more toward Cyan/Aqua (Blue). | |
| Aqua Hue | -1 | The color of Aqua didn’t change at all. | |
| Blue Hue | +52 | Moving the blues a lot closer to purple and magenta. | |
| Purple Hue | +5 | Moving Purples a little bit toward Magenta. | |
| Magenta Hue | 0 | Magenta color stays the same. | |
| Color Mixer (HSL – Saturation) | Red Saturation | +40 | Making the red tones much stronger. |
| Orange Saturation | +22 | Making the orange tones stronger. | |
| Yellow Saturation | -35 | Making yellow tones less bright. | |
| Green Saturation | -100 | Making all the green tones gray by completely desaturating them. | |
| Aqua Saturation | +29 | Increasing the strength of Aqua tones. | |
| Blue Saturation | -5 | Making the Blue tones a little less strong. | |
| Purple Saturation | -80 | A lot lessening the strength of purple tones. | |
| Magenta Saturation | +80 | A lot of magenta tones are getting stronger. | |
| Color Mixer (HSL – Luminance) | Red Luminance | -24 | Making red tones darker. |
| Orange Luminance | -10 | Orange tones that are a little darker. | |
| Yellow Luminance | +32 | Yellow tones that make things brighter. | |
| Green Luminance | +41 | Green tones that are very bright. | |
| Aqua Luminance | -51 | Aqua tones get a lot darker. | |
| Blue Luminance | +30 | Blue tones that are bright. | |
| Purple Luminance | +6 | Purple tones that are a little brighter. | |
| Magenta Luminance | +6 | Magenta tones that are a little brighter. |
Detail Panel
| Section | Setting | Value | Description |
| Detail (Sharpening) | Amount | 46 | Using a moderate amount of overall sharpening. |
| Radius | 1 | Adding sharpening to small areas of detail (small pixel area). | |
| Detail | 25 | Protecting smooth areas (low detail setting) and mostly sharpening edges. | |
| Masking | 0 | Sharpening the whole image evenly, even the parts that are noisy. |
Effects Panel
| Section | Setting | Value | Description |
| Detail (Noise Reduction) | Luminance | 16 | Adding a little bit of reduction to the noise in the grayscale. |
| Luminance Detail | 50 | During Luminance noise reduction, keep the level of detail at a default or moderate level. | |
| Luminance Contrast | 0 | There is no change in contrast when you reduce luminance noise. | |
| Color | 14 | Reducing colored speckles (chroma noise) by a small amount. | |
| Color Detail | 50 | Keeping the detail level at a default or moderate level while reducing color noise. | |
| Color Smoothness | 50 | Keeping the smoothness level at a default or moderate level while reducing color noise. | |
| Denoise (AI) | N/A | The feature doesn’t work with the current photo format, which is probably a JPG or TIF file, not a RAW file. |